Controlling Data Entry Using Form Fields
Creating 'Encoded' Name & Value Pairs
Passing data from one form to another
Addressing Form Field Validation with Regular Expressions and JavaScript 1.2
You are here: irt.org | Articles | JavaScript | Form | Chapter 6: Beginning JavaScript [ previous next ]
Published on: Sunday 29th April 2001 By: Paul Wilton
It's time to return to the Trivia Quiz as we left it in Chapter 3. So far we have defined the questions and answers in arrays, and defined a function to check whether the user's answer is correct. Now we know how to create HTML forms and elements, we can start using them in the quiz to provide the user input. By the end of this section the question form will look like the picture below.
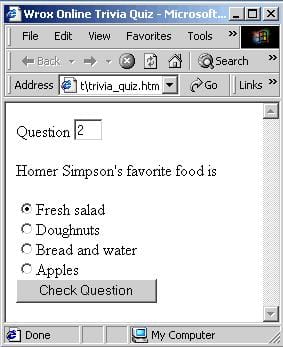
At present our questions are multi-choice; we represent the multi-choice options by a radio button group.
We create the form elements dynamically using our old friend document.write() and the information contained in the questions array. Once the user has selected the radio button representing the answer, they then click the Check Question button, which calls our checkAnswer() function, works out if the user got the question right, and lets them know. We then move on to the next question.
Let's start by creating the form elements.
The first thing we need to do is add a form to our page in which the radio buttons will be written. Load in trivia_quiz.htm and change the bottom of the page, below where the questions and answers arrays are defined as follows:
// assign answer for question 3
answers[2] = "C";

</SCRIPT>

<FORM NAME="QuestionForm">

Question
<INPUT TYPE="text" NAME=txtQNumber SIZE=1>

<SCRIPT LANGUAGE=JavaScript>
   document.write(getQuestion());
</SCRIPT>

<INPUT TYPE="button" VALUE="Check Question" NAME=buttonCheckQ
   onclick="return buttonCheckQ_onclick()">
</FORM>

</BODY>
</HTML>
We're inserting the new form, named QuestionForm, inside the body of the page.
The elements on the form are a text box, defined by the line:
<INPUT TYPE="text" NAME=txtQNumber SIZE=1>
which will hold the current question number, and a button named buttonCheck:
<INPUT TYPE="button" VALUE="Check Question" NAME=buttonCheckQ
   onclick="return buttonCheckQ_onclick()">
which when clicked will check the answer supplied by the user and let them know if they got it correct or not. The button has its onclick event connected to a function, buttonCheckQ_onclick(), which we'll create in a moment.
Where are the radio buttons you can see in the picture above? Well, we'll be using the document.write() method again to dynamically insert the questions as the page is loaded. That way we can pick a random question each time from our question array. It's the code:
<SCRIPT LANGUAGE=JavaScript>
   document.write(getQuestion());
</SCRIPT>
that inserts the question using the second function we need to add, getQuestion().
We saw in the code above, that the radio buttons required will be inserted by the getQuestion() function, and the buttonCheckQ_onclick() function is connected to the button's onclick event handler. We'll now add these functions to the top of the page in the same script block as the answerCorrect() function that we defined in Chapter 3.
Add the following lines to the top of the trivia_quiz.htm page.
<HTML>
<HEAD>
<TITLE>Wrox Online Trivia Quiz</TITLE>

<SCRIPT LANGUAGE=JavaScript>

var questionNumber;

function answerCorrect(questionNumber, answer)
{
   // declare a variable to hold return value
   var correct = false;

   // if answer provided is same as answer then correct answer is true
   if (answer == answers[questionNumber])
      correct = true;

   // return whether the answer was correct (true or false)
   return correct;
}

function getQuestion()
{
   questionNumber = Math.floor(Math.random() * (questions.length));
   var questionHTML = "<P>" + questions[questionNumber][0] + "</P>";
   var questionLength = questions[questionNumber].length;
   var questionChoice;

   for (questionChoice = 1;questionChoice < questionLength;questionChoice++)
   {
      questionHTML = questionHTML + "<INPUT TYPE=radio NAME=radQuestionChoice"
      if (questionChoice == 1)
      {
         questionHTML = questionHTML + " CHECKED";
      }
      questionHTML = questionHTML + ">";
      questionHTML = questionHTML + questions[questionNumber][questionChoice];
      questionHTML = questionHTML + "<BR>";
   }

   document.QuestionForm.txtQNumber.value = questionNumber + 1;
   return questionHTML;
}

function buttonCheckQ_onclick()
{
   var answer = 0;

   while (document.QuestionForm.radQuestionChoice[answer].checked != true)

   {
      answer++;
   }

   answer = String.fromCharCode(65 + answer);

   if (answerCorrect(questionNumber,answer) == true)
   {
      alert("You got it right");
   }
   else
   {
      alert("You got it wrong");
   }

   window.location.reload();
}

</SCRIPT>
</HEAD>
<BODY>
We will discuss the getQuestion() function first, which is used to build up the HTML needed to display the question to the user. We first want to select a random question from our questions array, so we need to generate a random number, which will provide the index for the question. We store this number in the global variable questionNumber that we declared at the top of the script block.
function getQuestion()
{
   questionNumber = Math.floor(Math.random() * (questions.length));
We generate a random number between 0 and 1 using the Math.random() method, and then multiply that by the number of questions in the questions array. This number is converted to an integer using the Math object's floor() method, which returns the lowest integer part of a floating point number. This is exactly what we want here: a randomly selected number from 0 to questions.length - 1. Don't forget that arrays start at an index of 0.
Our next task is to create the radio buttons, which allow the user to answer the question. We do this by building up the HTML that needs to be written to the page inside the variable questionHTML. We can then display the question using just one document.write(), which writes the whole question out in one go.
We start this process by declaring the questionHTML variable and setting it to the HTML needed to write the actual question to the page. This information is stored in the first index position of the second dimension of our questions array, that is questions[questionNumber][0], where questionNumber is the random index we generated before.
   var questionHTML = "<P>" + questions[questionNumber][0] + "</P>";
   var questionLength = questions[questionNumber].length;
   var questionChoice;
To create the possible answers for the user to select from, we need to know how many radio buttons are required, information that's stored in the length property of the second dimension of our questions array. Remember that the second dimension is really just an Array object stored in a particular position of our questions array and Array objects have a length property. We use the variable questionLength to store the length of the array, and also declare another variable, questionChoice, which we will use to loop through our array.
Now we can start looping through the question options and build up the radio button group. We do this in the next for loop. If it's the first radio button that we are creating the HTML for, then we add the CHECKED word to the <INPUT> tag. We do this to ensure that one of the radio buttons is checked, just in case the user tries to press the Check Answer button without actually providing one first.
   for (questionChoice = 1;questionChoice < questionLength;questionChoice++)
   {
      questionHTML = questionHTML + "<INPUT TYPE=radio NAME=radQuestionChoice"
      if (questionChoice == 1)
      {
         questionHTML = questionHTML + " CHECKED";
      {
      questionHTML = questionHTML + ">";
      questionHTML = questionHTML + questions[questionNumber][questionChoice];
      questionHTML = questionHTML + "<BR>";
   }
For example, on one loop of the for loop, the HTML built up in questionHTML may be:
<INPUT TYPE=radio NAME=radQuestionChoice CHECKED> A sixties rock group from Liverpool<BR>
With the looping finished and questionHTML containing the complete HTML needed to display one question, all that remains to do is to display the question number for the current question in the text box in the form, and then return the questionHTML string to the calling code. We use questionNumber + 1 as the question number purely for user friendliness. Even though it might be a question at index 0, most people think of starting at question 1 not question 0.
   document.QuestionForm.txtQNumber.value = questionNumber + 1;
   return questionHTML;
}
That completes the getQuestion() function. The final new code that needs looking at is the buttonCheckQ_onclick() function that fires when the button is clicked. We saw this added to our code above.
We start the function by declaring the variable answer and initializing it to 0. We'll be using this as the index when looping through the radio button group, and also to hold the actual answer.
function buttonCheckQ_onclick()
{
   var answer = 0;
The then use a while statement to loop through each of the radio buttons, incrementing the answer variable until it hits upon a radio button which is checked. At which point the loop ends and we now know which radio button the user chose as their answer, namely that at the index stored in the answer variable.
   while (document.QuestionForm.radQuestionChoice[answer].checked != true)

   {
      answer++;
   }
As our answers array holds the answers as A, B, C, D and so on, we need to convert the radio button index contained in answer into a character. We do this in the next line:
answer = String.fromCharCode(65 + answer);
This makes use of the fact that character code for A is 65, so if the user choose the first radio button, that is the one with an index of 0, we just need to add 65 and the index number contained in answer to get the answer's character code. This is converted to a character using the String object's fromCharCode() method. Remember that some methods of the String object can be used without having to actually create a String object ourselves (called static methods); we can use the native String object which is always present.
The answerCorrect() function we created in Chapter 3 is then used as part of an if statement. We pass the question number and the answer character to the function, and it returns true if the answer was correct. If it does return true, then we show a message box telling the user that they got the question right, otherwise the else statement lets them know that they got it wrong
   if (answerCorrect(questionNumber,answer) == true)
   {
      alert("You got it right");
   }
   else
   {
      alert("You got it wrong");
   }
Finally, we reload the page to select another random question.
   window.location.reload();
}
In the next chapter we'll be making the Trivia Quiz a more sophisticated multi-frame based application, also adding necessary features like making sure the user doesn't get the same question twice!!!
Controlling Data Entry Using Form Fields
Creating 'Encoded' Name & Value Pairs
Passing data from one form to another
Addressing Form Field Validation with Regular Expressions and JavaScript 1.2