Controlling Data Entry Using Form Fields
Creating 'Encoded' Name & Value Pairs
Passing data from one form to another
Addressing Form Field Validation with Regular Expressions and JavaScript 1.2
You are here: irt.org | Articles | JavaScript | Form | Chapter 6: Beginning JavaScript [ previous next ]
Published on: Sunday 29th April 2001 By: Paul Wilton
The text area element allows multi-line input of text. Other than this, it acts very much like the text box element.
However, unlike the text box, the textarea element has its own tag, the <TEXTAREA> tag. It also has two additional attributes: COLS and ROWS. The COLS attribute defines how many characters wide the textarea will be and the ROWS attribute defines how many character rows there will be. Setting the text inside the element is not done by using the VALUE attribute, but by putting it between the start and close tags. So if we want a textarea element 40 characters wide by 20 rows deep with initial text of "Hello World" on the first line and "Line 2" on the second line, then we would define this as:
<TEXTAREA NAME=myTextArea COLS=40 ROWS=20>
   Hello World
   Line 2
</TEXTAREA>
Another additional attribute of the <TEXTAREA> tag is the WRAP attribute, which determines what happens when the user types to the end of a line. The default value for this is off so that if the user does not hit return at the end of a line then it just keeps going, with a horizontal scroll bar appearing. To switch wrapping on we have two possible values we can use: nothing (that is just including the WRAP attribute on its own) and hard. As far as client-side processing goes both do the same thing: they switch wrapping on. However when we come to server-side processing they do make a difference to what information is sent to the server when the form is posted.
If we set the WRAP attribute on by including it in the tag definition, or setting it to soft, then wrapping will occur client side, but the carriage returns won't be posted to the server, just the text. If the WRAP attribute is set to hard then any carriage returns caused by wrapping will be converted to hard returns, that is, as if the user had hit the return key, and these will be sent to the server. Also we need to be aware that what a carriage return character actually is, is determined by the operating system that the browser is running on. For example, on Windows a carriage return is \r\n, whereas on a Macintosh the carriage return is \r and on Unix a carriage return is \n.
The Textarea object created by the <TEXTAREA> tag has the same properties, methods and events as the Text object we saw previously. Note that there is a value property even though the <TEXTAREA> tag does not have a VALUE attribute. The value property simply returns the text between the <TEXTAREA> and </TEXTAREA> tags. The events supported by the Textarea object include the onkeydown, onkeypress, onkeyup and onchange event handlers.
To help demonstrate how the onkeydown, onkeypress, onkeyup, and onchange events work, in particular the order in which they fire, let's create an example that tells us what events are firing:
<HTML>
<HEAD>

<SCRIPT LANGUAGE=JavaScript>
function DisplayEvent(eventName)
{
   var myMessage = window.document.form1.textarea2.value;
   myMessage = myMessage + eventName;
   window.document.form1.textarea2.value = myMessage;
}
</SCRIPT>
</HEAD>

<BODY>
<FORM NAME=form1>
   <TEXTAREA ROWS=15 COLS=40 NAME=textarea1
      onchange="DisplayEvent('onchange\n');"
      onkeydown="DisplayEvent('onkeydown\n');"
      onkeypress="DisplayEvent('onkeypress\n');"
      onkeyup="DisplayEvent('onkeyup\n\n');">
   </TEXTAREA>
   <TEXTAREA ROWS=15 COLS=40 NAME=textarea2>
   </TEXTAREA>
   <BR><BR>
   <INPUT TYPE="button" VALUE="Clear Event TextArea"
      NAME=button1 onclick="window.document.form1.textarea2.value=''">
</FORM>

</BODY>
</HTML>
Save this page as ch6_examp5.htm.
Load the page into your browser and see what happens when you type any letter into the first textarea box. You should see the events being fired listed in the second textarea box (onkeydown, onkeypress, onkeyup). If you click outside of the first textarea box you'll see the onchange event fire.
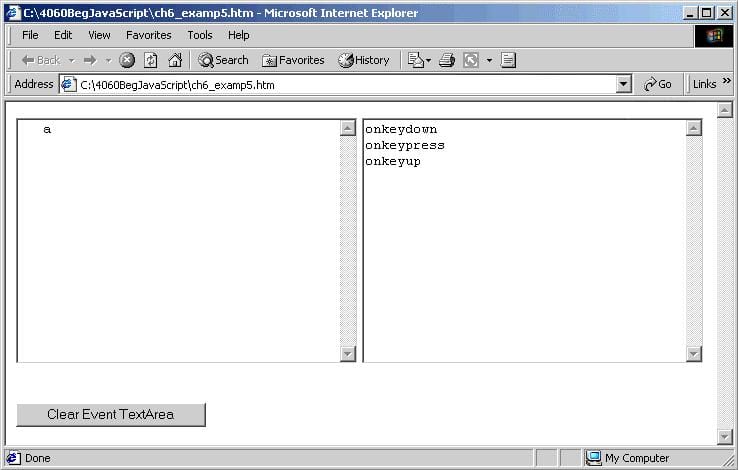
Experiment with the example to see what events fire, and when. Sometimes you will not get quite the results you expect. For example, if you press and hold a key down then in IE and NN 6 onkeydown and onkeypress will fire continuously until you let go, when just one onkeyup event will fire.
In NN 4.x, onkeydown will fire once, then onkeypress will fire continuously until you let go, when just one onkeyup will fire.
Within a form called form1 in the body of the page, we define two textareas and a button. The first textarea is the one whose events we are going to monitor. We attach code which calls the DisplayEvent() function to each of the onchange, onkeydown, onkeypress, and onkeyup event handlers. The value passed to the function reflects the name of the event firing.
   <TEXTAREA ROWS=15 COLS=40 NAME=textarea1
      onchange="DisplayEvent('onchange\n');"
      onkeydown="DisplayEvent('onkeydown\n');"
      onkeypress="DisplayEvent('onkeypress\n');"
      onkeyup="DisplayEvent('onkeyup\n\n');">
   </TEXTAREA>
Next we have an empty textarea, the same size as the first textarea.
   <TEXTAREA ROWS=15 COLS=40 NAME=textarea2>
   </TEXTAREA>
Finally we have our button element:
   <INPUT TYPE="button" VALUE="Clear Event TextArea"
      NAME=button1 onclick="window.document.form1.textarea2.value=''">
Notice that the onclick event handler for the button is not calling a function, but just executing a line of JavaScript. Although we do normally call functions it's not compulsory; if we have just one line of code to execute, it's easier just to insert that rather than create a function and call it. In this case, the onclick event handler is connected to some code that sets the contents of the second textarea to empty ('').
Now let's look at the DisplayEvent() function. This is defined in a script block in the head of the page. It adds the name of the event that it has been passed as a parameter to the text already contained in the second textarea:
function DisplayEvent(eventName)
{
   var myMessage = window.document.form1.textarea2.value;
   myMessage = myMessage + eventName;
   window.document.form1.textarea2.value = myMessage;
}Controlling Data Entry Using Form Fields
Creating 'Encoded' Name & Value Pairs
Passing data from one form to another
Addressing Form Field Validation with Regular Expressions and JavaScript 1.2