Controlling Data Entry Using Form Fields
Creating 'Encoded' Name & Value Pairs
Passing data from one form to another
Addressing Form Field Validation with Regular Expressions and JavaScript 1.2
You are here: irt.org | Articles | JavaScript | Form | Chapter 6: Beginning JavaScript [ previous next ]
Published on: Sunday 29th April 2001 By: Paul Wilton
To add a new option to a select element, we simply create a new Option object using the new operator, and then insert it into the options[] array of the Select object at an empty index position.
When creating a new Option object there are two parameters to pass, the first is the text you want to appear in the list, the second the value to be assigned to the option.
var myNewOption = new Option("TheText","TheValue");We then simply assign this Option object to an empty array element, for example:
document.theForm.theSelectObject.options[0] = myNewOption;
If you want to remove an option you simply set that part of the options[] array to null. For example, to remove the element we just inserted above, we need:
document.theForm.theSelectObject.options[0] = null;
When you remove an Option object from the options[] array, the array is reordered so that the array index values of all the options above the removed one have their index value decremented by one.
When you insert a new option at a certain index position, beware that it will overwrite any Option object that is already there.
Let's use the 'list of days' example we saw above to demonstrate adding and removing list options.
<HTML>
<HEAD>

<SCRIPT LANGUAGE=JavaScript>

function butRemoveWed_onclick()
{
   if (document.form1.theDay.options[2].text == "Wednesday")
   {
      document.form1.theDay.options[2] = null;
   }
   else
   {
      alert('There is no Wednesday here!');
   }
}

function butAddWed_onclick()
{
   if (document.form1.theDay.options[2].text != "Wednesday")
   {
      var indexCounter;
      var days = document.form1.theDay;
      var lastoption = new Option();
      days.options[6] = lastoption;

      for (indexCounter = 6;indexCounter > 2; indexCounter--)
      {
      days.options[indexCounter].text = days.options[indexCounter - 1].text;
      days.options[indexCounter].value = days.options[indexCounter - 1].value;
      }

      var option = new Option("Wednesday",2);
      days.options[2] = option;
   }
   else
   {
      alert('Do you want to have TWO Wednesdays?????');
   }
}

</SCRIPT>
</HEAD>
<BODY>

<FORM NAME=form1>
<SELECT NAME=theDay SIZE=5>
   <OPTION VALUE=0 SELECTED>Monday
   <OPTION VALUE=1>Tuesday
   <OPTION VALUE=2>Wednesday
   <OPTION VALUE=3>Thursday
   <OPTION VALUE=4>Friday
   <OPTION VALUE=5>Saturday
   <OPTION VALUE=6>Sunday
</SELECT>
<BR>
<INPUT TYPE="button" VALUE="Remove Wednesday" NAME=butRemoveWed
   onclick="butRemoveWed_onclick()">
<INPUT TYPE="button" VALUE="Add Wednesday" NAME=butAddWed
   onclick="butAddWed_onclick()">
<BR>
</FORM>
</BODY>
</HTML>
Save this as ch6_examp7.htm.
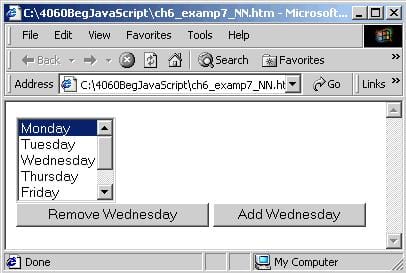
If you type the page in and load it into your browser, you should see the form below. Click the Remove Wednesday button and you'll see it disappear from the list. Add it back by clicking the Add Wednesday button. If you try and add a second Wednesday or remove a non-existent Wednesday, then you'll get a polite warning telling you that you can't do that.
Within the body of the page, we define a form with the name form1. This contains the select element containing day of the week options that we have seen above. The form also contains two buttons:
<INPUT TYPE="button" VALUE="Remove Wednesday" NAME=butRemoveWed
   onclick="butRemoveWed_onclick()">
<INPUT TYPE="button" VALUE="Add Wednesday" NAME=butAddWed
   onclick="butAddWed_onclick()">
Each of these buttons has its onclick event handler connected to some code that calls one of two functions: butRemoveWed_onclick() and butAddWed_onclick(). These functions are defined in a script block in the head of the page. We'll take a look at each of them in turn.
At the top of the page we have our first function, butRemoveWed_onclick(), which removes the Wednesday option.
function butRemoveWed_onclick()
{
   if (document.form1.theDay.options[2].text == "Wednesday")
   {
      document.form1.theDay.options[2] = null;
   }
   else
   {
      alert('There is no Wednesday here!');
   }
}
The first thing we do in the function is a sanity check: we must only try to remove the Wednesday option if it's there in the first place! We do this by seeing if the third option in the array, with index 2 because arrays start at index 0, has the text "Wednesday". If it does we can remove the Wednesday option by setting that particular option to null. If the third option in the array is not Wednesday, then we alert the user to the fact that there is no Wednesday to remove. Although I've used the text property in the if statement's condition, we could just have easily used the value property; it makes no difference.
Next we come to the butAddWed_onclick() function, which, as the name suggests, adds the Wednesday option.
This is slightly more complex than the code required to remove an option. First we use an if statement to check that there is not already a Wednesday option.
function butAddWed_onclick()
{
   if (document.form1.theDay.options[2].text != "Wednesday")
   {
      var indexCounter;
      var days = document.form1.theDay;
      var lastoption = new Option();
      days.options[6] = lastoption;

      for (indexCounter = 6;indexCounter > 2; indexCounter--)
      {
      days.options[indexCounter].text = days.options[indexCounter - 1].text;
      days.options[indexCounter].value = days.options[indexCounter - 1].value;
      }
If there is no Wednesday option, we then need to make space for the new Wednesday option to be inserted.
Before we do this we define two variables indexCounter and days, which refers to theDay select element and is a shorthand reference for our convenience. Next we create a new option with the variable name lastoption and assign this new option to the element at index position 6 in our options array. This previously had no contents. We next assign the text and value properties of all the Option objects from Thursday to Sunday to the Option that is at a one higher index in the options array, leaving a space in the options array at position 2 to put Wednesday in. This is the task for the for loop within the if statement.
Next, we create a new Option object by passing the text, "Wednesday" and the value 2 to the Option constructor. The Option object is then inserted into the options[] array at position 2, and hey presto it appears in our select box.
      var option = new Option("Wednesday",2);
      days.options[2] = option;
   }
We end the function by alerting the user to the fact that there is already a Wednesday option in the list, if the condition in the if statement is false.
   else
   {
      alert('Do you want to have TWO Wednesdays?????');
   }
}Controlling Data Entry Using Form Fields
Creating 'Encoded' Name & Value Pairs
Passing data from one form to another
Addressing Form Field Validation with Regular Expressions and JavaScript 1.2