Turning Tables Into Selection Lists
Drag and Drop with Microsoft Internet Explorer 5
You are here: irt.org | Articles | Dynamic HTML (DHTML) | Multimedia in Microsoft Internet Explorer [ previous next ]
Published on: Thursday 17th December 1998 By: Ryan Detert and Martin Webb
Note:
The examples presented in this article can only be viewed with Internet Explorer 4.0 or better, on the Windows platform.
If you are using a Windows machine, but do not have IE4, we'd recommend that you download IE4 from Microsoft so you can appreciate the examples presented.
Microsoft Internet Explorer 4.0 offers a powerful line of DHTML commands and functions. However, the most awe-inspiring dynamic special effects come from Explorer's built-in Visual Filters. These filters are similar to the ones you may see in graphics software such as Adobe Photoshop. These built-in features can save you time and web space. This tutorial will deal with how to implement these filters.
Note: for the following examples to be seen in full, then you must use Microsoft Internet Explorer 4+.
Visual Filters can be used to manipulate both regular text, as well as images. Here is an example of text-manipulation using the glow() filter:
Let's look at the code that did this amazing task:
<DIV STYLE="width:150; height:20; filter:Glow(color=red; strength=50)">
This logo is glowing!
</DIV>
The Blur filter was applied using a Cascading Style Sheet (CSS) Style attribute.
Cascading Style Sheet information may be placed between <STYLE></STYLE> tags, or they may be inserted between either <SPAN></SPAN> or <DIV></DIV> tags under a style attribute.
Cascading Style Sheets attributes are made up from the name/value pairs; the name of the Style property followed by the value of the Style property, separated by a colon and terminated by a semi-colon:
name: value;
When using Visual Filters, the name of the property is filter, and the value of the filter attribute is then made up of the name of the filter (nameFilter) to be applied followed by a further subset of name value pairs separated by commas, enclosed within parenthesis:
filter: filterName(name1=value1, name2=value2,...);
Each of the Visual Filters has its own set of name/value pairs.
Everything that you do using CSS can be implemented either by using HTML or JavaScript. For instance, to enable the Glow filter on an object with an ID called myId, in JavaScript this can be done using:
<SCRIPT LANGUAGE="JavaScript"><!--
myId.filters.Glow.enabled=true;

// or using the named index

myId.filters["Glow"].enabled=true;

// or numerical index

myId.filters[6].enabled=true;
//--></SCRIPT>
Only Microsoft Internet Explorer 4+ has support for the multimedia aspects of CSS and JavaScript, therefore, it is necessary to stop other browser failing. The inclusion of a simple test for the documents all object is all that is required.
The following example demonstrates how to enable and disable the blur filter:
Which is controlled simply with:
<DIV ID="myId1" STYLE="width:150; height:20; filter:Glow(color=red; strength=50)">
This text is glowing!
</DIV>

<FORM>
<INPUT TYPE="BUTTON" onClick="if (document.all) myId1.filters.Glow.enabled = false" VALUE="Disable Glow">
<INPUT TYPE="BUTTON" onClick="if (document.all) myId1.filters.Glow.enabled = true" VALUE="Enable Glow">
</FORM>
It is also possible to alter the values of the filters properties:
<SCRIPT LANGUAGE="JavaScript"><!--
myId.filters.Glow.strength=10;

// or using the named index

myId.filters["Glow"].strength=100;

// or numerical index

myId.filters[6].strength=0;
//--></SCRIPT>
For example:
Now that we've provided you with a basic overview of filters, let's put them to work.
Sets the level of opacity.
Syntax:
filter:Alpha(Opacity=0-100, FinishOpacity=0-100, Style=0|1|2|3, StartX=pixels, StartY=pixels, FinishX=pixels, FinishY=pixels)
0 - Uniform
1 - Linear
2 - Radial
3 - Rectangular
<DIV ID="AlphaId" STYLE="width:320; height:240; filter:Alpha(Opacity=50, FinishOpacity=100, Style=0, StartX=0, StartY=0, FinishX=320, FinishY=240)">
<IMG SRC="image.jpg" WIDTH="320" HEIGHT="240">
</DIV>
|
Syntax:
filter:Blur(Add=true|false, Direction=0|45|90|135|180|225|270|315, Strength=pixels)
  0 - Top
 45 - Top right
 90 - Right
135 - Bottom right
180 - Bottom
225 - Bottom left
270 - Left
315 - Top left
<DIV ID="BlurId" STYLE="width:320; height:240; filter:Blur(Add=true, Direction=45, Strength=50)">
<IMG SRC="image.jpg" WIDTH="320" HEIGHT="240">
</DIV>
|
|
Renders a color transparent.
Syntax:
filter:Chroma(Color=color)
<DIV ID="ChromaId" STYLE="width:320; height:320; filter:Chroma(Color=#FFFFFF)">
<IMG SRC="palette.gif" WIDTH="320" HEIGHT="320">
</DIV>

|
Creates the illusion of floating.
Syntax:
filter:DropShadow(Color=color, OffX=pixels, OffY=pixels, Positive=true|false)
<DIV ID="DropShadowId" STYLE="width:320; height:50; font-size: 32pt; filter:DropShadow(Color=#CCCCCC, OffX=10, OffY=10, Positive=true)">
<CENTER>This is some plain text</CENTER>
</DIV>
|
|
It is possible to combine Visual Filters, as in this following example. All that is required is the chaining of one filter definition with another.
FlipH - Creates a horizontal mirror image.
Syntax:
filter:FlipH()
FlipV - Creates a vertical mirror image.
Syntax:
filter:FlipV()
<DIV ID="FlipId" STYLE="width:320; height:50; font-size: 32pt; filter:FlipV() FlipH();">
<CENTER>This is some plain text</CENTER>
</DIV>
|
|
Gives the appearance of a glow.
Syntax:
filter:Glow(Color=color, Strength=1�255)
<DIV ID="GlowId" STYLE="width:320; height:50; font-size: 32pt; filter:Glow(Color=#CC66CC, Strength=10)">
<CENTER>This is some plain text</CENTER>
</DIV>
|
|
Renders in gray.
Syntax:
filter:Gray()
<DIV ID="GrayId" STYLE="width:320; height:240; filter:Gray()">
<IMG SRC="image.jpg" WIDTH="320" HEIGHT="240">
</DIV>
|
|
Reverses the hue, saturation, and brightness values.
Syntax:
filter:Invert()
<DIV ID="InvertId" STYLE="width:320; height:240; filter:Invert()">
<IMG SRC="image.jpg" WIDTH="320" HEIGHT="240">
</DIV>
|
|
Makes a transparent mask.
Syntax:
filter:Mask(Color=color)
<DIV>
<IMG SRC="image.jpg" WIDTH="320" HEIGHT="240" STYLE="position:absolute">
<DIV ID="MaskId" STYLE="position:relative; width:320; height:240; font-weight: bold; font-style: italic; color: #FF0000; font-size: 32pt; filter:Mask(Color=#FFFFFF)">
<CENTER>This is some plain text<BR>being used<BR>as a mask<BR>over an image</CENTER>
</DIV>
</DIV>
|
being used as a mask over an image |
Creates the illusion of a shadow.
Syntax:
filter:Shadow(Color=color, Direction=0|45|90|135|180|225|270|315)
  0 - Top
 45 - Top right
 90 - Right
135 - Bottom right
180 - Bottom
225 - Bottom left
270 - Left
315 - Top left
<DIV ID="ShadowId" STYLE="width:320; height:50; font-size: 32pt; filter:Shadow(Color=#CCCCCC, Direction=135)">
<CENTER>This is some plain text</CENTER>
</DIV>
|
|
Creates a wave-like distortion along the vertical axis.
Syntax:
filter:Wave(Add=true|false, Freq=number, LightStrength=0-100, Phase=0-100, Strength=0-255)
<DIV ID="WaveId" STYLE="width:320; height:240; filter:Wave(Add=false, Freq=2, LightStrength=10, Phase=0, Strength=10)">
<IMG SRC="image.jpg" WIDTH="320" HEIGHT="240">
</DIV>
|
|
Reverses the hue, saturation, and brightness values.
Syntax:
filter:Xray()
<DIV ID="XrayId" STYLE="width:320; height:240; filter:Xray()">
<IMG SRC="image.jpg" WIDTH="320" HEIGHT="240">
</DIV>
|
|
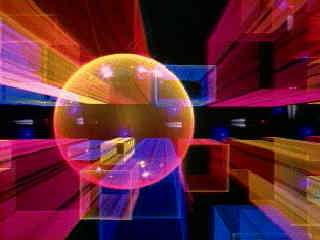
The working example illustrates how effective visual effects can be achieved with one image and several different Visual Filters.
In addition to the awe-inspriring special effects witnessed previously, Microsoft Internet Explorer 4.0 also offers another type of filter called the Transitional Filter. This type of filter works in much the same way as its compatriot the Visual Filter; however, this filter is used to transition an object from its current state to a future state, i.e. when changing the source of an image from one image to another. There are two types of Transitional Filters: Blend and Reveal.
The Transitional Filters use methods to work. There are three of these methods:
Note: These methods may also be used in conditional statements. For instance, to check if the transition has completed you may go if(blendTrans.Stop())
The Blend Transition Filter is used to perform a fade in or fade out effect.
Syntax:
filter:BlendTrans(Duration=duration)}
Duration - Length of time the transition should take to complete. Value, float. Value is expressed in seconds.milliseconds (0.000).
The Reveal Transition Filter allows you to show or hide visual objects, using any of the 23 predefined types of patterns.
Syntax:
filter:RevealTrans(Duration=seconds, Transition=0-23)
Duration - Number of seconds the transition should take to complete.
Transition - Type of pre-defined pattern:
0  - Box in
1  - Box out
2  - Circle in
3  - Circle out
4  - Wipe up
5  - Wipe down
6  - Wipe right
7  - Wipe left
8  - Vertical blinds
9  - Horizontal blinds
10 - Checkerboard across
11 - Checkerboard down
12 - Random dissolve
13 - Split vertical in
14 - Split vertical out
15 - Split horizontal in
16 - Split horizontal out
17 - Strips left down
18 - Strips left up
19 - Strips right down
20 - Strips right up
21 - Random bars horizontal
22 - Random bars vertical
23 - Any random pattern 0-22
|
|
Source:
You can also use Page Transition Filters via meta tags. These are useful for entering and exiting pages.
Syntax:
<META http-equiv="Page-Enter" CONTENT="RevealTrans(Duration=seconds, Transition=1-23)>
Duration- Length of time the transition should take to complete. Value, float. Value is expressed in seconds.milliseconds (0.000).
Transition - Type of pre-defined pattern:
0  - Box in
1  - Box out
2  - Circle in
3  - Circle out
4  - Wipe up
5  - Wipe down
6  - Wipe right
7  - Wipe left
8  - Vertical blinds
9  - Horizontal blinds
10 - Checkerboard across
11 - Checkerboard down
12 - Random dissolve
13 - Split vertical in
14 - Split vertical out
15 - Split horizontal in
16 - Split horizontal out
17 - Strips left down
18 - Strips left up
19 - Strips right down
20 - Strips right up
21 - Random bars horizontal
22 - Random bars vertical
23 - Any random pattern 0-22
NOTE: You may also change the http-equiv to either Page-Exit, Site-Enter, or Site-Exit. You may also use all four of the http-equiv meta tag types.
The Page Transition Filters are demonstrated in the Prêt à lire article on irt.org.
As you can see from some of these examples, filters can offer the ability to add a bit of dazzle to your Web page without the normal cost of file size or download time normally associated with anything other than plain HTML. However, beware of excessive use of filters, as with any image or animation that you add to your Web site, selective use can increase the attractiveness of a site, but overuse can and will offend. Also remember that these effects are only possible on MSIE4. There are additional filters and multimedia effects available that have not been discussed in this article, for example the Lights filter, which would take another article to describe in detail -- perhaps next time.
Turning Tables Into Selection Lists
Drag and Drop with Microsoft Internet Explorer 5
A Gift of "Life" : The Document Object Model